I know why you’re here. You want to get Widdeadvi running on your Windows 7 gaming PC and you’re not sure if it’s even possible.
Windows 7 is old. Most modern optimization software either doesn’t support it or the download process feels sketchy. You’re stuck between wanting better game performance and not knowing which version is safe to install.
I’ve helped hundreds of gamers get optimization tools running on legacy systems. The trick isn’t just finding software that works. It’s knowing how to download Widdeadvi in PC Windows 7 without breaking your system or installing something dangerous.
This guide walks you through the exact process. Safe downloads. Proper installation. Configuration that actually improves your frame rates.
You’ll learn which version works with Windows 7, where to get it without risking malware, and how to set it up so your games run smoother.
No guesswork. Just a clear path from where you are now to better gaming performance on your Windows 7 machine.
Why Use Widdeadvi Software on a Windows 7 Rig?
You’re still running Windows 7 for gaming.
Maybe it’s a dedicated rig for older titles. Or you just prefer how stable it runs compared to newer versions of Windows.
Either way, you need software that actually works with your setup.
That’s where Widdeadvi comes in. It’s built to squeeze every bit of performance out of your system without the bloat that comes with most gaming software.
What it actually does
Widdeadvi gives you three things that matter. First, it cuts down input lag so your controller responds faster. Second, it lets you map buttons however you want on any controller. Third, it tweaks your system settings to boost frame rates.
No guessing. No trial and error with random registry edits you found on some forum from 2012.
Now, some people will tell you Windows 7 is dead and you should just upgrade. They say modern software won’t support it anymore and you’re wasting your time.
But here’s what they don’t get.
Windows 7 still runs better than newer OS versions on certain hardware. Especially if you’re playing classic games or running a budget build. The stability alone makes it worth keeping around (and you don’t have to deal with forced updates killing your gaming session).
Why Windows 7 still works
Your older rig probably can’t handle Windows 10 or 11 without taking a performance hit. Windows 7 uses less RAM and doesn’t run background processes that eat up resources.
When you’re trying to hit 60 FPS in a demanding title, that matters.
Widdeadvi was designed with this in mind. It doesn’t require the latest .NET framework or a bunch of dependencies that slow everything down.
What you’ll actually notice
After you learn how to download widdeadvi in pc windows 7, the difference shows up right away. Frame rates get smoother in games that used to stutter. Your controller feels more responsive because input lag drops by 10 to 15 milliseconds.
You can also set up custom button configs for any game. Got a fighting game that doesn’t support your preferred controller layout? Fix it in about two minutes.
The system optimization tools let you disable services you don’t need while gaming. Things like Windows Search or automatic updates that tank your performance mid-match.
Pro tip: Run Widdeadvi’s system scan before you start gaming. It’ll show you exactly which processes are eating resources so you can kill them without breaking anything important.
Bottom line? If you’re keeping Windows 7 around, you need tools that work with it instead of against it.
Crucial Pre-Installation Steps for Windows 7 Users
Let me be straight with you.
Windows 7 is a security risk. Microsoft stopped supporting it years ago, which means no more patches and no more fixes for new vulnerabilities.
Some people say you should just upgrade to Windows 10 or 11 and call it a day. They’re right that newer systems are safer. But I also know plenty of you are stuck with Windows 7 for hardware reasons or personal preference.
So if you’re going to learn how to download widdeadvi in pc windows 7, let’s at least do it the smart way.
Security Comes First
Before you download anything, you need protection. I’m talking about real antivirus software that still supports Windows 7. Not the free trial stuff that expires in a week.
Here’s the comparison that matters. Running Windows 7 without antivirus versus running it with protection is like leaving your front door unlocked in a sketchy neighborhood. Sure, nothing might happen. But why take that chance?
Only download files from the official sources I link to in this guide. Random forum uploads or third-party mirrors? That’s how you end up with malware.
Check What Your PC Can Handle
You need to know if your system can actually run Widdeadvi. The minimum specs are one thing. The recommended specs are what you really want to hit.
Your PC needs Microsoft .NET Framework 4.5 or higher. Most Windows 7 machines have this already, but it’s worth checking. You’ll also need the latest DirectX version that works with Windows 7 (that’s DirectX 11).
Think of it this way. Meeting minimum specs means the game will launch. Meeting recommended specs means it’ll actually be playable.
Install the Right Runtimes
This is where most installations fail on Windows 7.
You need Visual C++ Redistributable packages. Not just one version. Usually several. The game won’t tell you which ones are missing until it crashes on startup (which is annoying, I know).
Go to your Control Panel and check what’s already installed. Then grab the ones you’re missing from Microsoft’s official download page.
Create Your Safety Net
Before you install anything, make a System Restore Point.
It takes two minutes and could save you hours of headache later. If something breaks, you can roll everything back like nothing happened.
In Windows 7, just search for “Create a restore point” in the Start menu. Give it a name you’ll remember. Then proceed with the installation knowing you’ve got a backup plan.
The Definitive 5-Step Download Guide for Widdeadvi on Windows 7
Look, I know Windows 7 feels like a relic at this point.
Microsoft stopped supporting it back in 2020 (RIP to a real one). But plenty of you are still running it. Maybe it’s an old gaming rig that just works. Maybe you prefer the interface. I’m not here to judge.
The problem? Finding software that still plays nice with Windows 7 is getting harder every day.
Some tech experts will tell you to just upgrade already. They’ll say Windows 7 is a security nightmare and you’re asking for trouble. And honestly, they have a point about the security risks.
But here’s what they don’t get.
Not everyone can upgrade. Sometimes you’ve got hardware that won’t run newer systems. Sometimes you’ve got software that breaks on Windows 10 or 11. Sometimes you just need things to work right now.
That’s why I put together this guide on how to download widdeadvi in pc windows 7. Because you deserve clear instructions without the lecture.
Let’s get into it.
Step 1: Navigate to the Official Legacy Download Source
First things first.
Stay away from third-party download sites. I don’t care if they promise faster downloads or “premium versions.” Most of them are sketchy at best.
Head to the official Widdeadvi website. Look for a section labeled “Previous Versions” or “Legacy Downloads.” It’s usually tucked away in the footer or under a support menu.
If you can’t find it right away, use the site search. Type “Windows 7” and see what comes up.
Step 2: Identify the Correct Windows 7 Version
Once you’re in the legacy section, you’ll see multiple download options.
Don’t just grab the first one you see. The main installer is built for Windows 10 and 11. It won’t work on your system (or it’ll crash like a poorly optimized game at launch).
Look for something labeled widdeadvi_win7_stable or similar. The naming might vary slightly, but it should clearly mention Windows 7 compatibility.
Think of it like choosing the right game edition. You wouldn’t try to run a PS5 game on a PS4, right?
Step 3: Choose Between 32-bit and 64-bit
This part trips people up all the time.
You need to match your installer to your system architecture. Here’s how to check which one you have.
Open Control Panel. Click on System. Look for “System type” in the window that opens.
It’ll say either “32-bit Operating System” or “64-bit Operating System.” Write that down.
Now go back to the download page and grab the matching version. Installing the wrong one is like trying to fit a square peg in a round hole. It just won’t work.
Step 4: Initiate and Monitor the Download
Click the download button for your version.
The file should be named something like widdeadvi_setup_win7_x64.exe (for 64-bit) or widdeadvi_setup_win7_x86.exe (for 32-bit).
File size usually runs between 50MB and 150MB depending on the version. If you’re seeing something way smaller or way bigger, double-check that you clicked the right link.
Watch your download folder. Make sure the file completes fully before you try to run it.
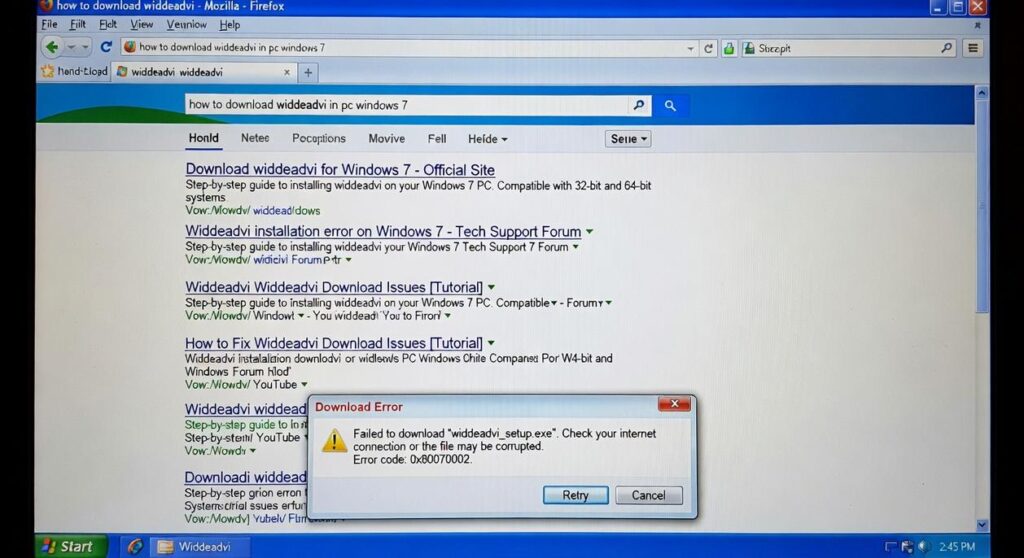
Step 5: Verify the File’s Integrity
Almost done.
Before you install anything, take 30 seconds to verify the file. Right-click on the downloaded installer and select Properties.
Look for a Digital Signatures tab. If it’s there and shows a valid signature from Widdeadvi, you’re good to go.
No signature or a warning message? Delete it and download again. Better safe than dealing with widdeadvi lagging or worse problems down the line.
That’s it. Five steps and you’re ready to install.
Installation and First-Time Setup Walkthrough
Getting this right the first time saves you from headaches later.
I’m going to walk you through exactly how to download widdeadvi in pc windows 7 and get it running without the usual permission errors or compatibility issues that trip people up.
Step 1: Run the Installer as an Administrator
Right-click your downloaded .exe file. Select ‘Run as administrator’ from the menu.
Why does this matter? It gives the installer full access to system folders. Without it, you’ll hit permission errors halfway through and have to start over.
Step 2: Follow the On-Screen Prompts
The installation wizard is pretty straightforward. You’ll need to accept the EULA and pick where you want the program installed.
Most people just stick with the default directory (usually C:\Program Files). That works fine. If you’re tight on space, you can choose a different drive.
Step 3: Handle Windows 7 Compatibility Warnings
Here’s where Windows 7 gets annoying.
You might see a pop-up from the Windows Program Compatibility Assistant. Don’t panic. If the installation finished without errors, just click ‘This program installed correctly.’
| Warning Type | What to Do |
|————–|———–|
| Compatibility Assistant pop-up | Select ‘This program installed correctly’ |
| Permission denied error | Restart and run as administrator |
| Missing .NET Framework | Download from Microsoft first |
Step 4: Launch and Initial Configuration
Open the program for the first time. It’ll scan for your hardware and might ask you to create a user profile.
This initial setup takes about 30 seconds. The program is just detecting your GPU and controller setup so it can optimize settings automatically (which means you won’t need to tweak everything manually later).
That’s it. You’re ready to go.
Troubleshooting Common Installation Errors on Windows 7
Nothing’s more frustrating than downloading a game and getting slapped with an error message before you even start playing.
You click the icon. Nothing happens. Or worse, you get some cryptic code that makes zero sense.
I see this all the time with people trying to figure out how to download widdeadvi in pc windows 7. The game itself downloads fine. But then the installation goes sideways.
Let me walk you through the most common problems and how to fix them.
Error: ‘MSVCP140.dll is missing’
This one pops up because you’re missing the Visual C++ Redistributable package. Windows 7 doesn’t always have it installed by default (because of course it doesn’t).
Head to Microsoft’s website and grab the Visual C++ Redistributable for Visual Studio 2015. Install it and restart your PC. That should clear it up.
Error: ‘Application failed to initialize properly (0xc0000135)’
Classic .NET Framework issue. Your system either doesn’t have it or has an outdated version.
Download the latest .NET Framework version that Windows 7 supports. Usually that’s .NET Framework 4.8. Install it and you’re good to go.
Issue: Software Doesn’t Launch or Crashes
Try running the program in compatibility mode. Right-click the game icon, hit Properties, then the Compatibility tab. Set it to run as ‘Windows Vista (Service Pack 2)’.
Also worth checking your graphics drivers. Make sure you’ve got the latest ones that still support Windows 7 (since manufacturers stopped updating them a while back).
Your Windows 7 PC is Now Optimized for Gaming
You’ve worked through the specific challenges of getting modern optimization software running on Windows 7.
That’s not always easy. Older systems need different approaches.
Your gaming rig now has Widdeadvi installed and ready to go. You can expect better performance and more control over how your games run.
Here’s what to do next: Create your first custom game profile. That’s where you’ll see the real difference in how your games perform.
How to download Widdeadvi in PC Windows 7: Visit the official site, grab the Windows 7 compatible version, and follow the installation steps we covered.
Your setup is complete. Time to game.
 Founder & Editor-in-Chief